


Standard Page Display
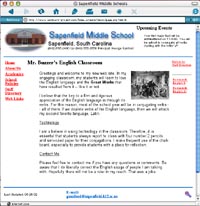 The standard page will probably be the most often used page layout on a school or classroom web site. It usually begins with a general look that has been designed by the technology facilitator, principal, team of teachers, or all of the above. It will include some sort of banner that identifies the school and/or district, a menu for navigating the site, a footer with copyright and other identifying information and any other element that will be common to all pages.
The PHP modules below are then copied from this web page and pasted to the HTML of the existing web page in order to pull content from the MySQL database to be included in the web page. In addition are modules that will build sub-menus for pages that have been added by the page owner, and the BLUE WRENCH link that takes the page owner to the edit version of the page.
<?
//    ------------------------------------------------------    //
//                        P A G E    M O D U L E S              //
//    ------------------------------------------------------    //
/*    The following modules are to be used in the standard
    web page.  The modules include:

         o   Load Content from Database
             This routine access the MySQL database
             and converts the labels and content
             to variables.

         o   Return to Parent Page
             This module will display a link through which
             the visitor to the web page can click and
             return to the parent page.

         o   Display Content Module
             Displays variables within formating.

         o   Submenu Module
             This routine accesses the database looking
             for pages that have been added from the
             current page.

         o   Link to Edit Module
             This module displays a small blue wrench,
             that when clicked will load the password
             checker and then the editor page.

*/
?>
|
Load Content from Database
<?
//                        Load Content from database            //
//    ------------------------------------------------------    //
//                                                              //
/*
    This module connects to the database, accessing the
    record who's field 'id' is carried with the link.
    The first line of the code contains the name of the
    'localhost' where your MySQL database is housed, the
    name of the database, and it's password.  These values
    will have to be entered.
*/

    $db=mysql_connect("host name","database name","database password");
    mysql_select_db("database name",$db);
        $result=mysql_query
("select * from page where id = $id",$db);
        While ($myrow = mysql_fetch_row($result))
            {
                  $email_contact = $myrow[1];
                  $telephone_contact = $myrow[2];
                  $site_id = $myrow[3];
                  $content_title_1 = $myrow[4];
                  $content_body_1 = nl2br($myrow[5]);
                  $content_size_1 = $myrow[6];
                  $content_image_1 = $myrow[7];
                  $content_title_2 = $myrow[8];
                  $content_body_2 = $myrow[9];
                  $content_size_2 = $myrow[10];
                  $content_image_2 = $myrow[11];
                  $content_title_3 = $myrow[12];
                  $content_body_3 = $myrow[13];
                  $content_size_3 = $myrow[14];
                  $content_image_3 = $myrow[15];
                  $last_updated = $myrow[16];
                  $grade_level = $myrow[17];
                  $subject = $myrow[18];
                  $name_contact = $myrow[19];
                  $page_title = $myrow[20];
                  $content_image_1_align = $myrow[21];
                  $content_image_2_align = $myrow[22];
                  $content_image_3_align = $myrow[23];
                  $font_face_1 = $myrow[24];
                  $font_face_2 = $myrow[25];
                  $font_face_3 = $myrow[26];
                  $parent_id = $myrow[27];
                  $code = $myrow[28];
                  $password = $myrow[29];
                  $type = $myrow[30];
            }

$page_title_size = $content_size_1 + 2;
$content_title_1_size = $content_size_1 + 1;
//                                                              //
//    ------------------------------------------------------    //
?>
|
- Change localhost to the name of the computer that is hosting the MySQL database (usually localhost).
- Change database name to the name of the MySQL database that holds the page content. This will have to be done twice in the module.
- Change database password with the password for the database.
require ('incs/connect.inc');
Display Content Module
This module displays the basic content of the page. Called a Content Element, this module will display the title of the page, the sub-title of the content element, a body of text (several paragraphs possible), and on image, which can be left or right justified with the text wrapping around.Up to two additional content elements can be pasted into a single web page, providing the opportunity for regularly updated note in specific positions of the page, or more than one part, with separate sub heading, in the main body of the page.
<?
//                        Display Content Module                //
//    ------------------------------------------------------    //
/*
    This module actually displays the content of the page.
    The variables are:
        $page_title -- the main title of the page
        $content_title_1 -- a sub-title for a body of
                            content
        $content_body_1 -- the text of the content
    It is important to note that the database structure is
    set to take three sets of content_title and content_
    body.  So three of these "Display Content Modules" can
    be planted in your web page for three distinct content
    elements:
        content_title_2 & 3
        content_body_2 & 3
        and the associated text sizes and fonts.
*/
echo("
        <font    size=$page_title_size><b>
            $page_title</b></font><p>
        <font    size=$content_title_1_size><b>
            $content_title_1</b></font><p>
        <font    size=$content_size_1
                face=$font_face_1>
            $content_body_1</font>
    ");
//                                                              //
//    ------------------------------------------------------    //
?>
|
It is also important to note that the database actually holds variables for three content elements. Each includes a subheading, a body of text, an image, and text font and size. Because of this, you can place up to three of these modules around on your page. You might have them stacked in the body of the page so that owners can have up to three different articles on a page, or these sets of information, each with its own subheading. You might also have them placed around on the page so that there is room for the owner to place regularly updated notes in the upper right of the page, or in other locations.
If you use more than one of the modules, each variable must be numbered. The variables in the module to the left are numbered one:
$content_body_1
$content_size_1
$content_image_1
Link to Edit Module
This is a small module that simply displays a blue wrench icon, which, when clicked, enables the owner of the page to edit its content. The wrench actually links to a password page that prompts the owner to enter the password for the page. It tests the password, and if there is a match, displays the edit page.
<?
//                        Link to Edit Module                    //
//    ------------------------------------------------------     //
//                                                               //
/*
    This module displays an icon, a blue wrench (to the
    left), that when clicked, will access the password
    check page.
*/
echo("
    <form    action=password_check.php
            method=post>
        <input    type=hidden
                name=id
                value=$id>
        <input    type=image
                src=images/wrench_25.jpg>
    </form>
    ");
//                                                              //
//    ------------------------------------------------------    //
?>
|
The BLUE WRENCH icon is to the left and can be downloaded for use in your site. You can use other icons if you prefer. The only modification to this module will be in the pathname for the icon image.
<?
//                  Submenu Routine                          //
//   ------------------------------------------------------  //
//                                                           //
/*
   This module will search the page database for pages
   that have been added from this page -- sub pages of
   the current page.  Those page titles are accessed by
   this module and listed as a submenu.
*/
echo("
<table cellpadding=3 cellspacing=0 border=0>

   ");
// Access
   $db=mysql_connect("host name","database name","password");
   mysql_select_db("database name",$db);
      $result=mysql_query("select * from page where parent_id = $id",$db);
      While ($myrow = mysql_fetch_row($result))
         {
   $db=mysql_connect("host name","database name","password");
   mysql_select_db("database name",$db);
      $resulta=mysql_query("select * from page where id = $myrow[0]",$db);
         While ($myrowa = mysql_fetch_row($resulta))
            {
               $sub_page_title = $myrowa[20];
               $sub_page_type = $myrowa[30];
            }
         $filename = 'page.php';
         if ($sub_page_type == 'homework')
            {
               $filename = 'hw.php';
            }
echo("
<tr>
<td>
<font size=1 face=arial,helvetica>
<a href=$filename?id=$myrow[0]>
$sub_page_title</a></font></td></tr>
   ");
         }
echo("

</table>
   ");
//                                                           //
//   ------------------------------------------------------  //
?>
|
Return to Parent Page
<?
//                        Return to Parent Page                 //
//    ------------------------------------------------------    //
/*
    This small module access the record of the current
    page and checks for a parent page.  If there is a
    parent page, it will display a link to the parent
    page.  The link will include the title of the parent
    page.
*/

        if ($parent_id > 0)
            {
// Access
    $db=mysql_connect("host name","database name","database password");
        mysql_select_db("database name",$db);
            $result=mysql_query
            ("select * from page where id = $parent_id",$db);
            While ($myrow = mysql_fetch_row($result))
                {
                    print"<font size=1 face=arial,helvetica>
                    <a href=page.php?id=$parent_id>
                    Return to $myrow[20]</a></font><p>";
                }

            }
//                                                              //
//    ------------------------------------------------------    //
?>
|
Since this module accesses the database, you will need to make the following modification for this page.
- Change localhost to the name of the computer that is hosting the MySQL database (usually host name).
- Change database name to the name of the MySQL database that holds the page content. This will have to be done twice in the module.
- Change database password with the password for the database.